
How To Install Package Bees in a Top Bar Hive
by Anita Deeley at BeverlyBees.com
If you want to install package bees in a top bar hive, read on. If you are installing package bees in a Langstroth hive, please read How To Install Package Bees In A Langstroth Hive.

Preparing to Install Package Bees – Be ready when your bees arrive.
All equipment needs to be set up, leveled and in place. You need at a minimum –
- Hive Stand (may or may not be needed depending on your top bar hive style)
- Top Bar Hive Body
- Top Bars with Comb Guides (such as angled top bars, Popsicle sticks or wax starter strips). You should have enough top bars to completely cover your hive.
- A Follower Board
- Outer Cover – This will vary depending on the style of your top bar hive and could be anything from a piece of plywood to a telescoping or gabled cover.
- A large feeder filled with 1:1 sugar syrup or a few combs of honey/pollen/nectar from another disease free top bar hive.

Pick up your bees as soon as they arrive, either from a local dealer or the post office. Check that the bees are still alive. An inch or more of dead bees piled up on the bottom is not a good sign. If you see this, you need to call the supplier.
Install the bees as soon as possible after arrival. If it is going to be a day or two before the install, you will want to put the bees in a cool, but not cold location, in a dark, draft free area such as a garage, basement etc until you are ready. Lightly mist the outside of the package screen gently using a spray bottle with 1:1 sugar syrup to feed the bees, twice a day as needed.
You will need a clean spray bottle that has never been used for pesticides, cleaning solutions etc. Fill it with 1:1 sugar syrup. Sugar syrup should be 1 part white cane sugar dissolved in 1 part warm water (by weight or volume) and cooled to room temp. You need to make enough for your feeder and your spray bottle.
You will also need:
- a hive tool
- a lit smoker
- smoker fuel and lighter
- a bee brush or feather
- bee suit/veil
- paper clip or thumb tack
- duct tape (just in case)
- a pocket knife
Let’s Install Some Bees!
Late afternoon is the best time to install the bees into their new hive to lessen the impacts of drifting and lost bees. Make sure your smoker is well lit. Although it is not usually used when installing package bees it is a good habit to get into when you start inspecting your hives.
Optional – If it is above 60 F, mist the outside of the package very lightly with sugar syrup. This gives the bees a snack and helps prevent too many from flying around. Do not do this if it is cold outside.
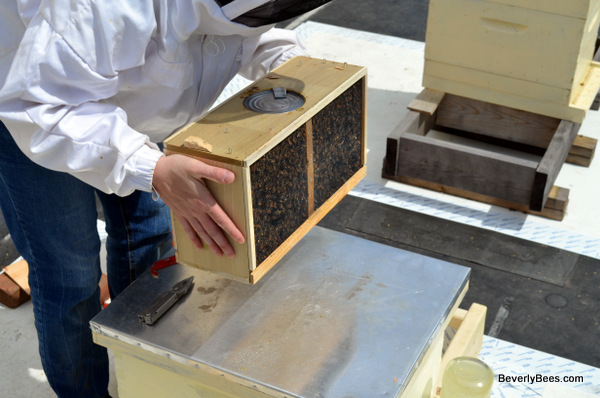
Using your hive tool, pry open the lid of the box.

Bump the package against the ground or the top of the hive to dislodge the bees.
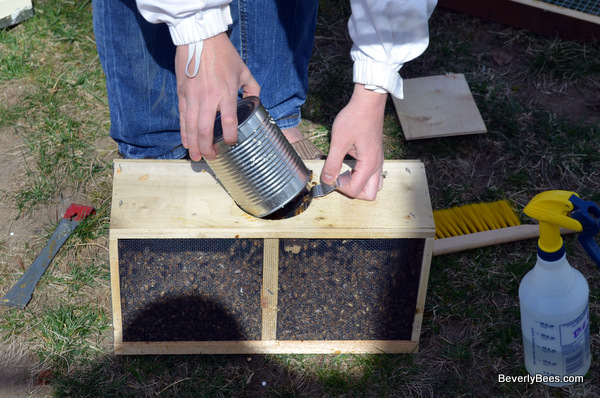
Notice how all the bees are now at the bottom of the box. Remove the feeder can. Hold the tab for the queen cage. Don’t let go or she may fall into the box of bees!
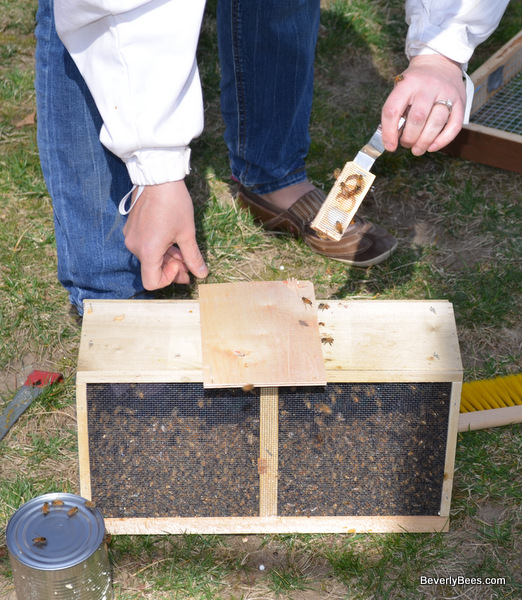
Remove the queen cage from the package of bees. Replace the lid on the package so the bees cannot escape.
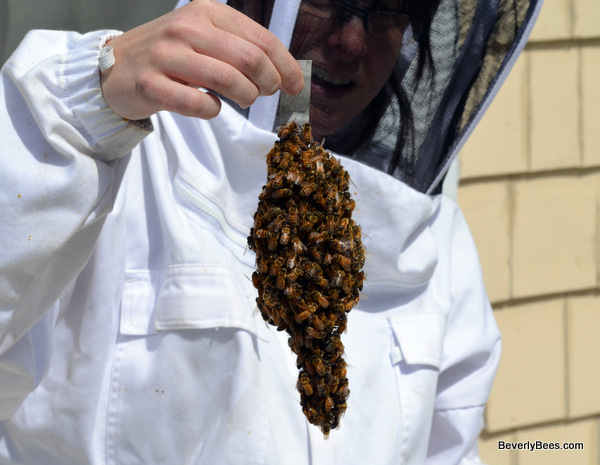
If bees are clustering on the queen cage, brush them into the hive with a bee brush or feather so you can inspect the queen.
Long Live The Queen
IMPORTANT – Inspect the queen and make sure she is alive and healthy. Watch her walk. Check that she is not gimpy, count her legs, make sure they are all there. Check that the queen is alive. If she is dead or injured, put the queen cage back in the package, close it up and store it in a cool dark place. Call your dealer ASAP to get a replacement. 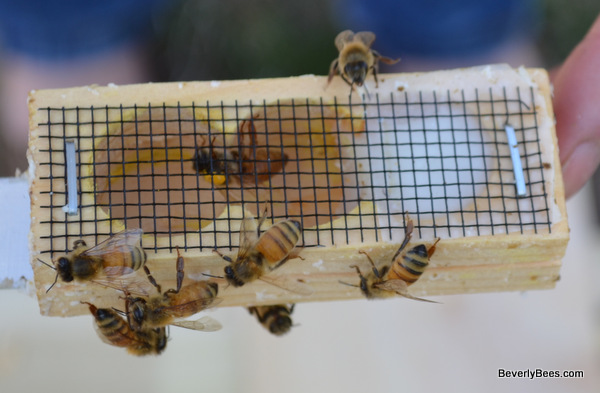
Some queen cages have two corks, one on each end. Only remove the cork from the CANDY END of the queen cage with your knife. I am pointing to the candy end in the picture below.
Now Let’s Install The Queen!
Remove a 5-6 bars near the opening of your hive. When installing the queen cage into a top bar hive, it is best to hang the queen cage on an empty bar without comb. This bar should be 3-4 bars from the entrance of the hive. The cage in the picture below came with a tab attached that made it easy to hang from a top bar by using a thumb tack. You can also attach a paperclip around your queen cage and use this to hang it. Be sure not to hurt the queen in the process! The important part is to hang the cage directly below the bar, in the center of the bar. Make sure the cage is not hanging on either side of the bar or between two bars. It needs to be hanging directly underneath only one bar because the bees will cluster around the queen cage and start drawing comb here. When the cage is aligned directly under one bar, this helps the bees draw their comb correctly.
When you install bees into your top bar hive, you want to give them only about 10 bars of empty space at first. This is a large enough space to make them feel comfortable, but not too large for them to manage. Place your follower board at the end of the 10 bars to make the hive smaller. As the bees build out the comb you will need to move the follower board back a few bars at a time to give them space to build. Remove a few more bars to open up the hive, leaving the queen in place. If you have comb with stores to feed the bees, be sure this comb is placed into the hive on the bar or bars next to the queen cage, when you put the bars back into the hive. It is great idea to place the bar with the queen between two combs, if available. If you are using a feeder to feed the bees you will wait to install it until later.
Take your package of bees, remove the cover and shake a few handfuls of bees onto the queen cage. These bees will cluster around the queen and stick their butts in the air to release the nasonov pheromone, which tells the other bees the location of the queen and hive. For more information on how to shake a package of bees, please read How To Install Bees in a Langstroth Hive. Shake the rest of the bees into the space in the hive where you removed the bars. Try to get as many bees out as you can. Don’t worry if you don’t get 100% of the bees out, the rest of the bees will find their way into the hive.

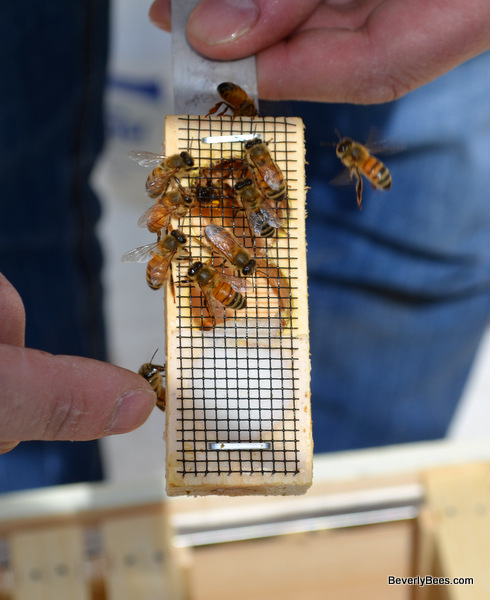
Another view of the bees in the hive. You can see the queen cage is completely covered with bees now. I only removed a few bars when installing this package but feel free to remove as many as you need to get the bees into the hive.

Alternatively, you can also shake all the bees directly into the hive and pick up the bar holding the queen and dip it into the bees, to get a cluster around the cage. After the cluster is around the queen cage replace the bar with the queen and cluster back on the hive, 3-4 bars from the entrance. Gently replace all the top bars, closing off the hive. Brush bees out of the way as needed so you do not squish them when replacing the bars and cover.

Place the cover on the top bar hive. Leave the package in front of the hive until nightfall so any bees left in there can find their way home.

3 hours After Package Install
- Suit up, light your smoker – although it probably won’t be needed now it is a good habit to get into. Open up the top bar from the back and check to see if the bees are clustering on the queen cage. If they are clustering all is well. If you are using a feeder, now you can place the feeder in the hive as close to the cluster as possible. Close up the hive and don’t disturb the bees for 3 days.
- If the bees are not clustering around the queen cage, they could be preparing to abscond due to having another queen in the package (sometimes there is a loose queen running around in there). Try to find the other queen and remove her, close the hive back up and check back in a few hours.
- Do not touch the hive for at least 3 days. This is the hardest part. But it is essential. If you disturb the bees too much they may kill their queen instead of accepting her.
- Bees will be flying everywhere. They are very confused. Soon you will see them flying outside in front of the hive doing orientation flights. This will last for a few days and then calm down.
- Look for bees carrying out dead bees, the undertaker bees. This is one of the first things you will see and it will help you know the colony is doing well.
- Look for bees bringing in pollen on their legs which they need to feed the brood. This is a good sign you will have a laying queen soon.
Feeding the Bees
- Package bees without comb have no food, honey, pollen or bee bread and can starve if not fed. Feeding 1:1 syrup stimulates them to make wax which they need to build their home and to store their food inside.
- Keep the feeder full and keep on feeding your bees 1:1 syrup until they have at least 10 combs drawn out, or as needed. Be careful not to overfeed during a honey flow.
3 days later – Check for Release and Remove The Queen Cage
- Suit up, gently smoke the bees with a puff of smoke in the entrance. Open the hive up, removing one bar at a time until you reach the cluster and the queen cage. Be very careful moving any newly drawn comb as it is very fragile until it sets, be sure to hold the comb perpendicular to the ground. See if the queen has been released. If she has it is time to remove the queen cage. If the queen has not been released check to see that she is still alive and remove the cork from the non candy end. Be careful not to let the queen fly away. Close up the hive and check it again in a few days.
After the queen cage has been removed, close the hive back up and try not to disturb it for another week. At which time you can check for eggs and brood to make sure the queen is laying.
Wyatt Mangum has some great tips on installing bees in a top bar hive. Check out his videos here –


