Microbes & Bees
At the Beginners Intensive segment of the Treatment Free Beekeeping Conference Laurie Herboldsheimer of Golden Rule Honey talked about her intense passion for the importance of the microbes that live in the honeybee colony. She has done extensive research, reading, writing and presenting about the subject and has even met with scientists who are researching these microbes. Laurie sometimes goes by the name Ramona and hosted the conference with her husband Dean. She is the co-author of “The Complete Idiot’s Guide to Beekeeping” and a treatment free beekeeper with over 50 colonies in MA.
Laurie has a whole collection of articles on her website referencing the microbes relationship with honeybees. Her site is full of information and worth taking a look at to learn more. You can find it here. Laurie said that inside the honeybee colony are yeasts, bacteria, fungi and viruses and we are only now learning the importance of what they do. These microbes live in the bee bread and guts of the honeybee. There are between 6 and 9 major families of bacteria living in the honey stomach and the rest of the bee gut in differing proportions. The ileum of the bee is a long tube which extends from the midgut to the rectum and it is very rich in bacteria. The bacteria that lives there is actually integrated into the flesh of the bee. This bacteria cannot be separated from the lining of the ileum and cannot be cultured. Once the ileum is absent the bacteria will not survive. These microbes and the honeybee function as one organism.
There are also microbes in the honey stomach that help the bees process nectar. Honey is a fermented food that has a microbial contribution. Before the worker bee leaves to forage for food, she eats to get fuel. In the food she eats are microbes. Inside the honeybee, the proventriculus separates the digestive area from the honey stomach. The honey stomach is the carrying pouch for nectar and the bees fuel tank. As the bee is out gathering pollen she puts some of the fuel she consumed prior to leaving on the pollen and mixes it as it is collected. This kick starts the fermentation process of the pollen into bee bread. Within the first hour that the pollen is collected the fermentation process begins. It takes approximately 3 weeks to ferment the pollen. You can think of it as a pollen pickle. The microbes assist the bees with this and help make the fatty acids, sterols, organic acids, antibiotics, enzymes, vitamins and minerals available to the bees.
After Laurie’s microbe talk, Dean Stiglitz gave a talk called “Where Do Honeybees Come From?” His presentation is available online on his website so I’ll just give a brief summary here. Drones are born from an unfertilized egg which the queen lays. Although each drone in a colony has genes in different proportions, each drone has DNA from the queen only. Also the drone’s sperm is identical to itself. A drone has no father to provide him DNA. The worker bees and queens come from fertilized eggs and contain genes from a father and their mother – the queen. When the drone mates with a queen he dies but he passes on his genes (which are identical to the queen) to the next generation. Since drones have no father they are basically a vector for two queens from different colonies to mate with each other.
Later in the afternoon Dean and Laurie brought everyone outside for an inspection of their hives where they went over some basics for new beekeepers.
How To Light A Smoker & Other Hive Inspection Tips
You can use any fuel in a smoker. Pine needles work really well. To light your smoker first make a bed of coals and put the fuel above that. Get the base burning really well. You really want to see flames before you put more fuel inside it. You want to get smoke out of the smoker and not flames. The smoke is used to mask the alarm pheromone of the bee.
When smoking the hive, puff a little smoke into the entrance and under the inner cover. Blow the smoke across the top of the frame and not into the frames. When removing the telescoping cover place it upside down on the ground. When removing the inner cover be sure to scan it for the queen. You can sometimes find her there. Don’t stand in front of the hive entrance and don’t put a shadow across the frames if you can help it.

Dean and Laurie use woven plastic grain bags as inner covers for their hive which they purchase new from a feed store. The bags breathe a little bit and when you pull them off and it seems to make the bees less mad. They also do not usually paint their hives.

They do however build burr comb on top of the frames. Check it out in this picture below.

When pulling the first frame out of a langstroth hive, pick the frame that is second in because the first may be attached to the wall of the hive. Dean and Laurie like to use the giant hive tool for their inspections. But the shipping can cost more than the hive tool so order a few if you buy it.
When you do a hive inspection start with the bottom box, not the top box, because bees will move down. If you start with the top box then you have more bees to work with on the bottom box instead of having them more evenly divided. Lift and pry boxes at the same time, don’t just pry. Use your knee to help lift them if they are heavy.

When you are placing the boxes down be sure to put the box on the top cover or on the hive kitty corner so that only 4 points are touching. With less surface area touching there will be less bees to squish.

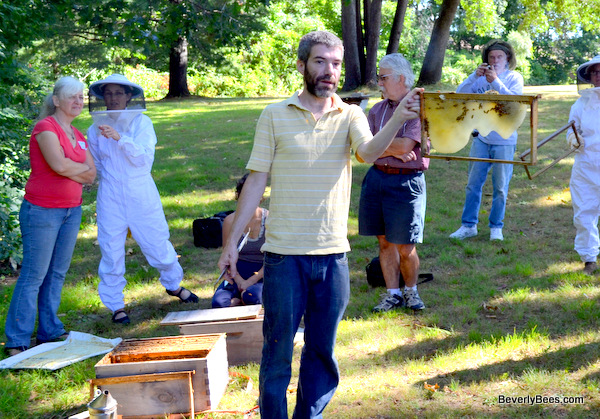
In this picture, Dean is going over how to do a hive inspection. Note the top box is placed kitty corner on the inside of the top cover and he is holding the giant hive tool in his hand as well as a newly drawn frame.

Dean and Laurie use foundationless deep frames with a popsicle stick glued to the top as a comb guide. They do not wire their frames and use only deeps to create an unlimited brood nest. Dean mentioned if you use a tangential extractor with a basket you do not need to wire the frames for extracting. It is easiest to put the popsicle sticks in the frame before they are assembled.

Here is a closeup picture of the frame.

Don’t spread all the frames out when inspecting or bees will get in between the frames and they can get squished. Move frames as a unit and do not leave gaps except for the frame you are inspecting. When you return the frame to the hive touch the frame to another frame and the bees will move out of the way.
With foundationless frames and fresh comb full of honey you need to be careful and try not to move it much. When moving combs, put fingers under the ears of the frame. Keep the comb in one direction. Turn it around before turning upside down and keep comb perpendicular to the ground, never at an angle. If the bees start building a comb and it’s pointing the wrong direction you may be able to push it back gently to the center to encourage them to build it correctly. Foundationless hives need to be level side to side so the frames are drawn straight.
When looking for the queen pull the frame out and scan the adjacent frame still in the hive and you may see her. The queen runs from the light and prefers dark. By the time you take out the next frame she may have moved somewhere else.
One last tip – when supering with foundationless frames always put the boxes on top. Move 3 frames of brood into the middle of the top box. Bees want to be in between the comb which is why you need three frames of brood. Put the empty frames to the outside. The reason for putting the boxes on top is to make room above the hive. Since bees like to build down this makes the bees feel like there is a damaged nest without honey on top and they will work in earnest to fix it. If you undersuper or nadir the bees will not move down unless they run out of room.
Stay tuned for my next post about Michael Bush’s talk. I have a notebook full of notes, pictures and more videos of the conference and will be posting about if all next week. You can subscribe to this blog to be notified of each new post here or get a weekly summary of new posts by signing up for our email newsletter here. Dean and Laurie also have a great video library from previous conferences on their website which can be located here.
Other Posts You May Enjoy:
- Top Bar Hive Honey Harvest With Sam Comfort
- Top Bar Hive – A New Member In My Bee Family
- Treatment Free Beekeeping Conference Plus “What Bees Need”
- Mass Bee Field Day 2012
- Neonicotinoids Harm Native Bees + Techniques In Queen Rearing – Mass Bee Spring Meeting 2012
